2D DESIGN
- Getting to know the basic tools in 2D Design
The 2D Design Software Screen
Learning a Couple of the basic tools before proceeding with the tutorials provided by the software.
The first tool I learnt about in 2D Design was the fact that the grid (10mm squared) can be taken off the background and put back on.
There are then two locks which can be selected between:
Step Lock (above left) allows the cursor to lie between the dots (10mm squares) on the page; whereas, Grid Lock (above right) enables the cursor to only select the points and make connections from one to another. These two locks are selected from the right hand toolbar. You do not have to have a lock on. This means anywhere on the page can be selected.
- Tutorial 3 - Basic Drawing
Using straight lines and the connection tools which are selected from the drag toolbar on each icon, I tried out each tool with and without the different locks.
Selecting a specific area and clicking on the Zoom In icon, zooms in the area to fit to the whole screen. You can then zoom out again quickly using the Zoom last icon.
Using the connection tool and the Radial lock allows the angles to be 45 degrees only! The radial lock icon is in the right hand toolbar.
The attach tool, found in the right hand toolbar allows separate lines and shapes to be joined together. Depending on the tool used to attach (straight line or arc) depends on the join (attachment).
I played around with the delete options. In 2D design it can sometimes be quite annoying that you cannot undo a series of steps. It only allows the last thing done to be undone, otherwise there are different tools for deleting.
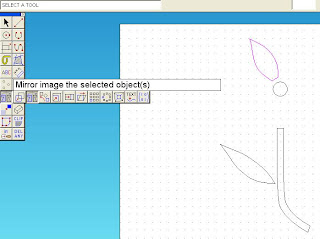
- Tutorial 6 - Transformations (Flower)
Selecting the petal on the left, and choosing the Mirror Image transformation tool. Making sure the grid lock was on I drew the centre of symmetry down the stalk. The settings of the transformation were set to repeat. Therefore a new leaf is flipped to the other side of the stem.
To create the petals around the centre of the flower.
Using the mirror transformation tool selected from the left toolbar.
Changing the settings to repeat and the rotation angle to 60 degrees. Also how many more of the repeated shapes wanted.
The petals were then repeated and rotated around the flower centre.
Tutorial 15 - Contours
Contour lines have many different uses, they provide tool paths or graphical effects.
The two hearts here demonstrate the two types of paths:
On the left is the tool path, which produces a radius (round arc) around a point whereas, on the right shows the graphical path, which is the accurate contour line.
If I'd have carried on selecting the lines to contour, they would go round and round the shape until met in the centre.
The contour spacings can be changed. The butterflies wings are set to 5mm as opposed to 10mm in the heart shapes.
Again this butterfly shows the tool path contour lines.
The cube net here can have its outside contour line extracted so the inner lines aren't seen.
The net is selected and the contour line spacing set to 0 as I wanted the exact replica of the net outside lines shape.
The net is selected and the contour line spacing set to 0 as I wanted the exact replica of the net outside lines shape.
I located the boundary (the outside of the net shape) which then produced the contour line.
- Tutorial 17 - Construction Points
Construction points can be used to divide a shape up. In this case the the curved trapezium. The number of divisions and the type of lines is selected. (10 divisions single lines)
I then learnt how to control the construction points, enabling the settings were changed to 'construction point' so the lines could be attached. Using the attach tool joins up selected construction points on the shape
Once I had learned how to use the construction points, I had a play around with circle, I set the circle to be split up into 13 sections at 30degrees each using the central point.
- Tutorial 20 - Dimensioning and Layers
I found this tutorial really useful, learning how to add dimensions to designs. There are three angles at which dimensions can be added, vertical, horizontal and diagonally.
First of all I changed the name of one of the default layers to 'dimensions', so this enables me to store dimensions separate so the different layers could all be seen separate.
As already mentioned there are three dimension angles; vertical, horizontal and diagonal.
Once all of the dimensions had been added to the shape, turning off the dimensions layer turning of the visible and active parameters leaves just the dryer outline.
Changing the dryer to invisible and inactive leaves just the dimensions.
The layers are changed using the 'Layer...' function in the toolbar at the top of the programmes screen.


No comments:
Post a Comment